Peruse peruse!
I'm questioning whether my Experimental piece is not experimental!
So yesterday I googled experimental embroidery and this was one of the addresses it came up with -
http://www.vads.ac.uk/
I was on here for at least an hour last night (the lost time zone place is the Internet!) instead of working on the embroidery!!
There are pages and pages of images for inspiration in all areas of the Arts...I am going to wash one of my samples to see what happens...perhaps that could be the experimental bit(?).
Thursday 2 June 2011
Sunday 29 May 2011
Onward to assessment piece!
I know I'm slow putting the stages on this blog but well busy busy!!


I went to the Aintree Stitch fair earlier this month and met, amongst other talented people, Embroiders, quilters, knitters...I was there with the Knit 1 Pass it on crowd showing people how to knit & Crochet...and my extreme Tunsian crochet hook!
Anyway I digress....Below are some pictures of my thought process, samples and the final piece in 2 stages.
This picture below is a Collage developed from the splitting of the Pomegrante drawings.
It's made up of printed papers, fabrics, sequins, glitter glue, painted string....the finer details of the design had to be lost as some parts of it were really close together.

The design for this was then blown up on the photocopier and transferred to Calico which I stretched onto a frame.
Below is one of the samples working out how to attach the purple fabric to the calico and keep the undulating texture of the collage.

The sample below is of the stitches used...i was trying to work out needle size to go through the two layers of fabric and which size thread to use....I will pretend this was done before the final piece!!(oh no-one will know!)


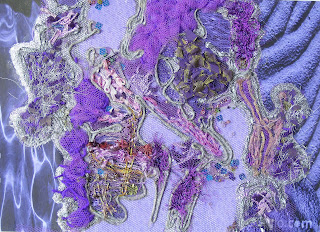
This picture is of my final piece in the first stage.
There are lines of Running stitch outlining the design transferred onto the back of the calico backing...it was interesting doing it that way as the results were totally random.
I have also Couched on some old metal necklace chains, don't you think they compliment the undulating texture and shine of the fabric?
At this point I'd embroidered some Spiders web, wipped & woven.

On the collage there were flat spaces which I wanted to recreate on my final piece...that's the part were it has the light coming through...I havent finished that yet I'm playing with different ideas....

This one below is a detail showing the silver thread with chain

The sections were I have started to fill in sections with various stitches.

This is a close up of the cutback section....i have dissolvable fabric with metallic sewing woven behind...This will provide something to embroider on and help keep the shape...i must stiffen this part!

So good progress but slower than i thought...i guess that comes from using the designing method of 'Design as you go'!!
Just to remind this is my work and soley mine please donot use any images.
Monday 25 April 2011
C&G Level 3 Embroidery samples-Hand stitches
I was so ready for this part of this Module!!!
LINEAR STITCHES
Loosely based on the Pomegranet line drawings.
The first sample was stitched on cotton...which was fine with these stitches as they are all flat lightweight stitches.

TEXTURED SURFACE
This one was based on the Tonal drawings from the photographs of natural light & dark tones.
I used the photo of root of my miniture willow tree....very weird close up!
I could'nt find the cotton I'd used so the following set were on Calico.

BLOCKS OF PATTERN
We had to change our colour values too hence the Folk colours....It was based on the Modern art blocks of colour painting!
The Calico is perfect for these set of samples as the asked for stitches are pretty heavy-weight when worked.

And the final sample.
ISOLATED STITCHES
My favourite design as this is based on the section of star sky my star sign is based!!

And it was done on holiday!
Right so now ready to start the final exercise.
AN EXPERIMENTAL SAMPLE!
Am away to look at my design from the strips which influenced the collage, as a starting point for this larger than 25cm and using my ingenuity, sample!
I'll post back with the results when I'm done...tut day job sure does get in the way!!
Don't forget to add yourself to the follower list to read the updates or leave a message to say hello!
Saturday 9 April 2011
Module 1: Drawing & Designing - Line.
I like others who are studying the City & Guilds course at home on their own, feel isolated in their stitching world!
When I searched for others to see what is expected of you I found so few to look at.
This blog is to record the trails and errors I have throughout the course! There will be many!
This will be the place I put my images of the work that's given for the Modules.
Although it won't be 'til I've sent it off to the tutor that we'll know if it's good enough and more needs to be added!
I have already forgotten which month I began...I think it was February...and at this point I have one more Hand stitching sample then the experimental larger sample. Once they're done I will have to research into Line as element in Design...a page or two with illustrations...
Exercise 1
Pomegrant as subject of Line Design.
 In different weights of pencil.
 Then the fruit is cut up and drawn concentrating on the detail.

 Various colours and media were used to add further detalling.
 I decided there was too many shapes so used just one side and flipped it.
 Again colour and details were added.
 Design was the cut into strips to alter the design.
I'm just adding the final touches to a texture collage which is to be the basis of my Experimental Sample.
There are a lot more sheets inbetween but I thought it's useful to see to see the bones of the design process.
There will be explaining to do before I send it off for assessment!
That's it for now...I want to start my final hand stitching sample.
When I searched for others to see what is expected of you I found so few to look at.
This blog is to record the trails and errors I have throughout the course! There will be many!
This will be the place I put my images of the work that's given for the Modules.
Although it won't be 'til I've sent it off to the tutor that we'll know if it's good enough and more needs to be added!
I have already forgotten which month I began...I think it was February...and at this point I have one more Hand stitching sample then the experimental larger sample. Once they're done I will have to research into Line as element in Design...a page or two with illustrations...
Exercise 1
Pomegrant as subject of Line Design.


Next step a section is taken, re-drawn and blown up to A5 size.


I'm just adding the final touches to a texture collage which is to be the basis of my Experimental Sample.
There are a lot more sheets inbetween but I thought it's useful to see to see the bones of the design process.
There will be explaining to do before I send it off for assessment!
That's it for now...I want to start my final hand stitching sample.
Subscribe to:
Posts (Atom)